and I found some fun holiday signs that
were already painted, glittered, and strung with hangers -
but they were blank.
Hmm.
I love blank!!
So, at 50% off I paid $1.50 - $2.00
for a few of these painted, glittered, hangered (ha!)
blanks.
This one came with a beautiful glittery silver bow
tied on as a hanger, but it had to go.
I can't get all "paint-y" knowing I'm trying
not to mess up the bow.
So the bow had to go.
(I actually tried to untie the knots first
to salvage it and use it again after
I painted, but that didn't work out).
I must have left my bow un-tying fingers
elsewhere today.
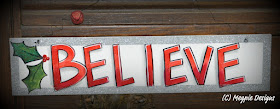
I wanted to make a glittery "BELIEVE" sign.
So I made a pattern by writing the word
"BELIEVE" on tracing paper.
I centered it onto the front of the sign
and used transfer paper and a
stylus to outline the letters.
I outlined each letter with red paint
loose and quick - not trying to get perfect
coverage ... just a starting point
for the shading I did next.
To shade, wet a flat brush
and blot it on a paper towel.
Dip one corner of the brush into a puddle
of paint, and brush back and forth
on a palette (or waxed paper) until the
paint becomes distributed along the bristles.
It will be stronger on one side and fade
towards the other side.
You want the part of the brush with the
most paint against the letter,
and the faded side away from the letter.
Think "LEFT" and "LOWER" when
shading; meaning you'll be putting paint
on the left and lower sides of whatever you're
shading - in this case, letters.
Once dry, go over each letter again
with the red paint, this time you're trying
to achieve good coverage
and an overall "even" look to the letters.
Then go over the bottom third of each
letter with a darker shade of red.
Use a liner brush to outline each
of the letters with thinned black paint.
I decided to add some holly leaves,
so I made a pattern and transferred them
onto my sign board.
I painted the leaves a medium green,
and outlined them with the liner brush
and thinned black paint.
Then I dipped a paintbrush handle into
red paint and added some berries.
I LOVE GLITTER!
So I added some of Plaid's Extreme Glitter
... green to the leaves ... red to the letters and berries.
Then for good measure,
I coated the whole thing with
Plaid Extreme Glitter - Hologram.
Peace Out


Useful information .. I am very happy to read this article .. thanks for Giving us this Useful information. Fantastic walk-throughs. I Appreciate this post.
ReplyDeleteSign blank