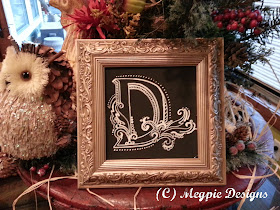
Here's a little something I whipped
up in my studio today:
Do you love it??
I love it!!!
It was simple to make;
It was simple to make;
I'll show you how.
I started with an open frame.
I've had it for years.
I have many of these. Random fetish.
Anyway!
Materials List:
Open Frame
Plywood (cut to fit frame)
Chalkboard Paint (black)
Paint Pen (white)
Tracing Paper (to make pattern)
Transfer Paper
Stylus
E6000 Adhesive
Materials List:
Open Frame
Plywood (cut to fit frame)
Chalkboard Paint (black)
Paint Pen (white)
Tracing Paper (to make pattern)
Transfer Paper
Stylus
E6000 Adhesive
I flipped it over and measured the opening.
I cut a piece of plywood to fit
the opening.
Measure twice, cut once, right?
Wrong.
It took me three tries to get it right.
That's just how I roll.
I sanded the rough edge I'd cut,
and painted the plywood with two coats
of black chalkboard paint.
Now for the fun part!
I wanted to "doodle" a monogram
onto the black surface,
and outline it with a white paint pen
for a "permanent" chalkboard design.
I started with a stencil,
and closed the the openings
for my monogram base.
I doodled and sketched until I
liked the monogram design.
I used light-colored transfer paper
and a stylus to get my design onto my
painted plywood piece.
I used a white paint pen to go over
all the transfer lines, and then I added
some more doodles and dots.
I used a bead of E6000 adhesive
along the ledge of my frame
and glued my plywood piece in place.
~ Voila! ~
There you have it!
I'm going to finish off the back with
some kraft paper cut to size.
That way I can add a little inscription to
my gift recipient.
Cute and simple, huh!!
Love it!!
~ Peace and Picture Doodles ~


No comments:
Post a Comment
Please! Share your thoughts about this post!!