Wednesday, December 11, 2013

Clay Dough Ornaments

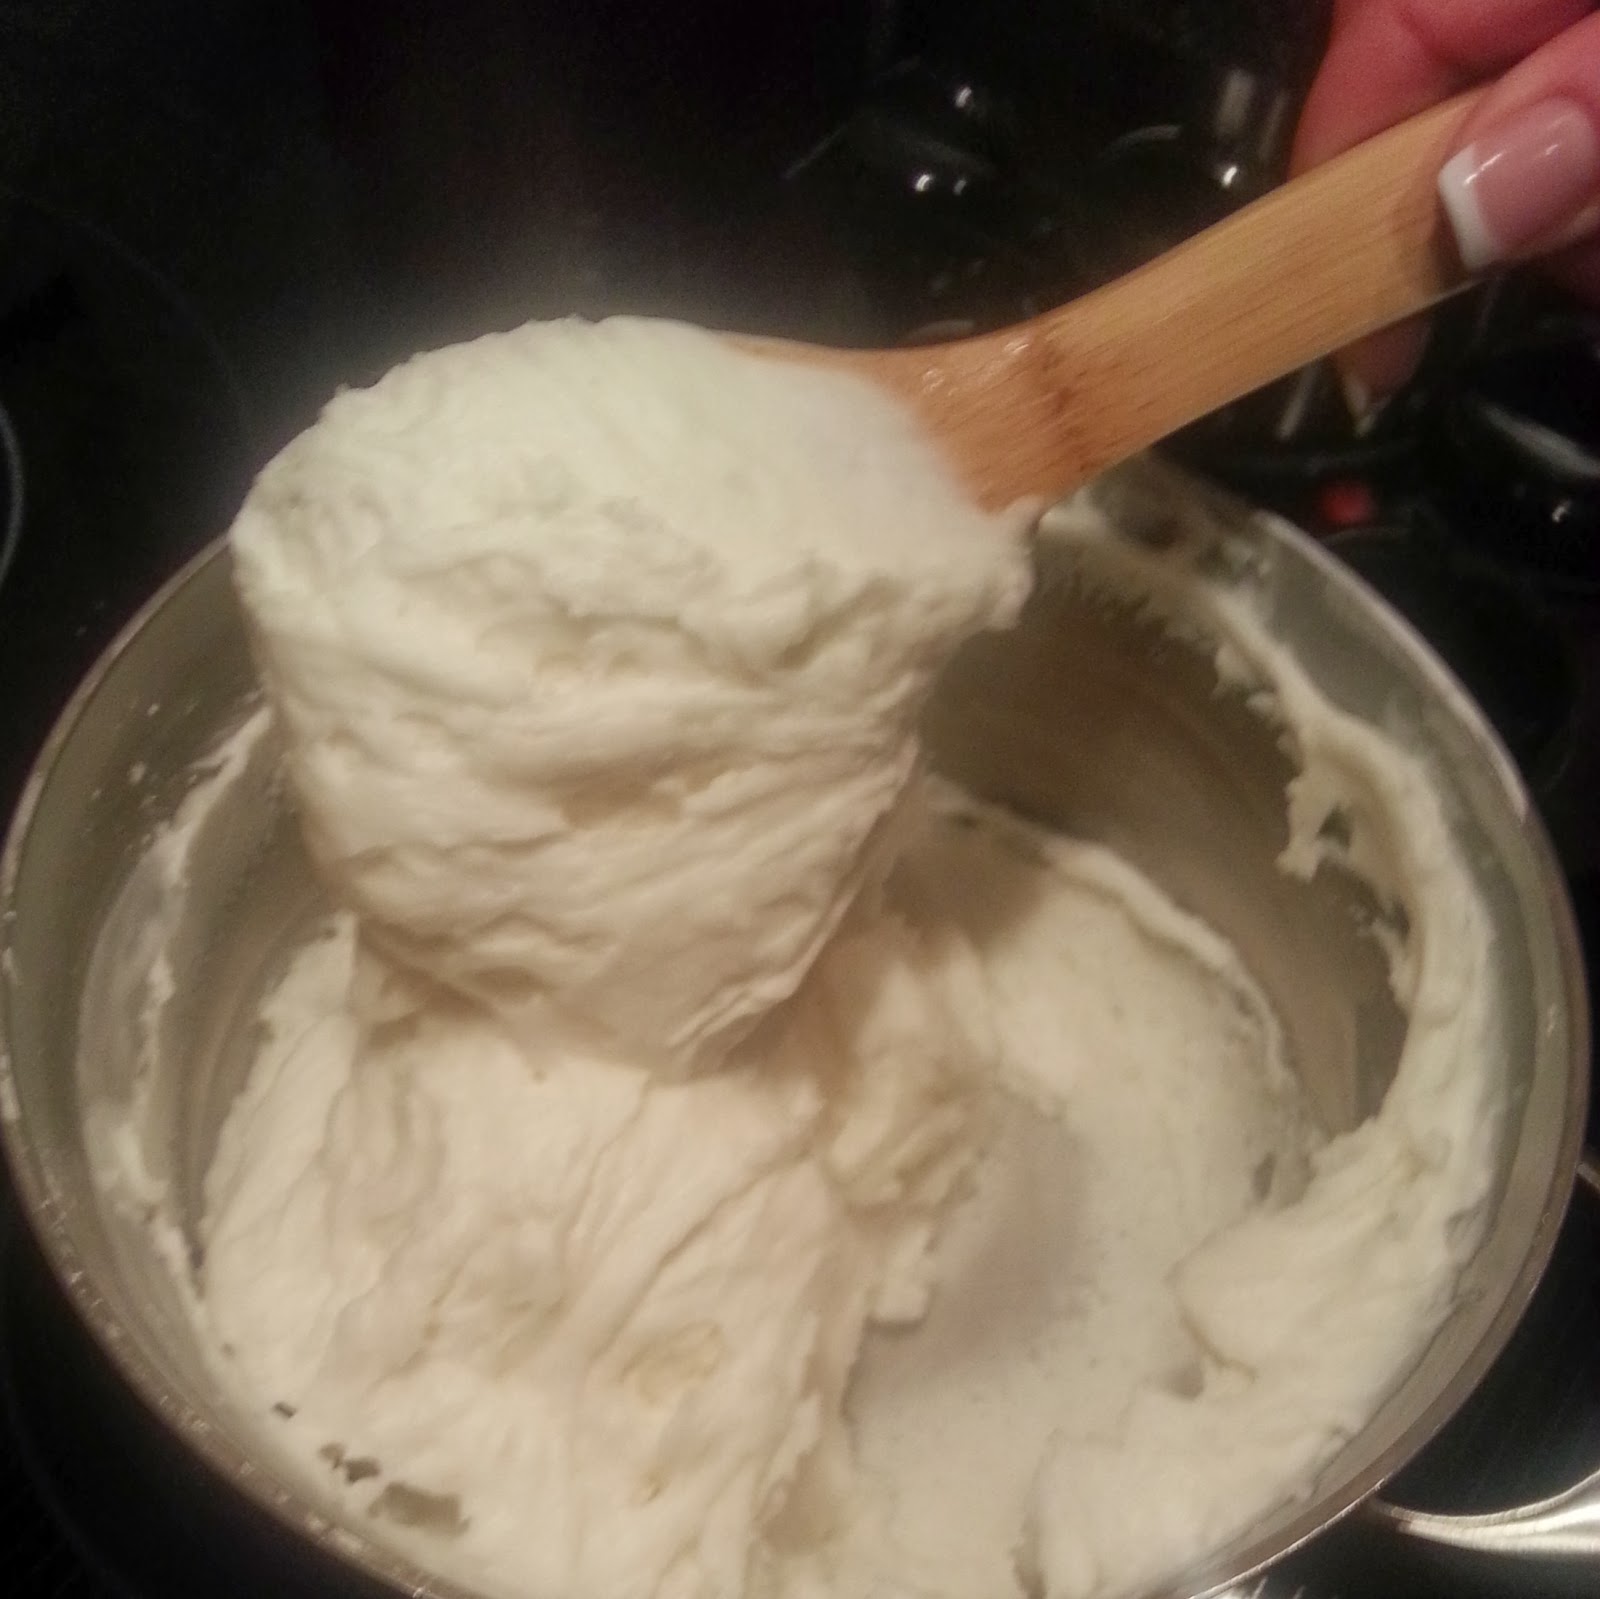
Bright, White Clay Dough


While I can always use the salt scrub effect
on my dry, papery man-hands ~
(you know, rinsing my paintbrush after every
color change really does a number
on my skin!)
~ I've made the salt dough ornaments.

You know, the classic 
"been there, done that"
so when I found a recipe for smooth, bright
white ornaments ... I had to try it!


Here's the recipe:

2 Cups Baking Soda
1 Cup Cornstarch
1 1/4 Cups Water 

 
 Stir ingredients together in a 2 quart saucepan.


Bring to a boil over medium-high heat,
stirring constantly with a wooden spoon.


Continue to stir until mixture is boiling.


Once the mixture starts to boil,
things will happen quickly!  Continue to
stir ~ suddenly the mixture will
resemble mashed potatoes.


As soon as the mixture looks like mashed
potatoes, immediately dump onto
a cookie sheet and cover with a damp
towel.  Allow mixture to cool.


Spread work surface with a light
dusting of cornstarch.

Divide dough in half, keeping the
unused half under the damp towel to
preserve the texture.
(It dries out fairly quickly).


Use cookie cutters or small knife to cut shapes.


Don't forget to poke holes for hanging!
I used a straw.
You could also use rubber stamps
to make impressions on the soft dough.
Love the idea, but we were iced
in and unable to even leave the driveway
and my stamp collection resides
down the street and across the way in my
studio.  Which might as well be in
Siberia since I can't leave my house.


Shapes will air dry, but you can speed
the drying process along by placing
them in a preheated 250 degree oven.
After 15 minutes, turn the shapes and
continue to dry, or bake another 15 minutes.

Allow to cool before painting
and adding ribbon for hanging.


~ Peace and Productive Snow Days ~


Tuesday, November 19, 2013

Personalized Canvas

Now that I'm comfortable painting
Cardinals, it's time to switch it up and
leap outside my comfort zone ...
to Hornets!


I painted this personalized canvas for a
teenager - I wanted to make it big and bold
(since my last hornet was only 2" tall!)


Let's pretend I still have a photo
of the blank 12" x 24" canvas ... and that
I took pictures while I base coated it.
uh - hm.
Visualize a paper plate with a large puddle
of dark gray acrylic paint and a large
overlapping puddle of white acrylic paint on it.
Now visualize rolling a sponge paint
roller randomly through the paint and
applying it to the canvas.
 
Does your vision look something like this?
 
 
I made a pattern of the boy's name and
the oversized hornet and used
transfer paper and a stylus to get the
main pattern lines onto the canvas.


Then I took a flat brush and wet it,
blotted it on a paper towel, and dipped one
corner of the brush in a small puddle
of the dark gray paint.


Next I went around the left and lower
sides of each main pattern line,
reapplying paint to the brush as necessary
(usually after every long stroke).


You're just going for some quick dimension here,
don't focus too much on perfection.
I always shade again after the base-coating
has been completed.
 
 
Next, I added some short, quick highlights
on the top and right sides of the letters
with white acrylic paint loaded the
same way; on a clean blotted flat brush
with the paint only on one corner.
I base coated the main design.
(using school colors and more than
one coat for opaque coverage)
 
 
Yikes!  Scary eyes!
More fitting for a demon than an
aggressive little Hornet.  We'll fix 'em!
 
 
I added a basketball for this Hornet.
Grant is our basketball star, after all!
I used a darker shade of my base color
to go over the bottom third or so of each of
my letters.  This adds a bit of interest.


Now its time to repeat the shading around
the left and lower sides of the
letters and the hornet design.  Once the
shading has dried, I apply highlights in the same
manner, but to the top and right sides
of each design element.
 
I added some highlights to those scary eyes,
and to the parts of the hornet I
wanted to appear more dimensional.
 
 
I used a very thin liner brush dipped in black
paint to outline the hornet and the letters.
I used a 1/4" flat brush to add some
border lines around the edges of the canvas.


My paint supply at the house was limited,
so in order to paint the top third
of the letters with a lighter shade of blue,
I mixed a tiny bit of white in with my original
blue base coat color.


I thought the border outline was a little
boring, so I added a thin white
line to the top and right sides of the
main black border line, and a little gray
to the left and lower sides.
Still didn't pop, so I used the liner brush
dipped in black again and sort of
outlined each design element
(letters, border, and some of the hornet)


I added some highlight lines
with the liner brush and white paint.

Once the paint was completely dry,
I used an emery board (limited supplies here)
and sanded a bit off the basketball
and the right sides of the letters.

I brushed two coats of sealer onto the
top and edges of the canvas.
I used Mod Podge in matte finish as
my sealer.  I let it dry overnight and it looks
pretty great!  I hope Grant likes it!


~ Peace and Personalized Canvas ~

Tuesday, October 29, 2013

Easy Halloween Tees!

~ EASY HALLOWEEN TEE SHIRTS! ~


It's been WaY too long since I last blogged,
no excuses, just one or three major life events
may or may not have occurred in quick succession
(and some concurrently);
but here I am, and I'm sharing something
that is SO typically ME!

That is, I've been agitated lately that I'm
so busy driving and cooking and cleaning and
scheduling and checking and packing
and loading and unloading and moving and
sleeping and unboxing and tidying
that I have no time for crafting!
Then as I drop the boys off at the gym
at 0700 this morning, I'm thinking
"oh my gosh, it's Halloween in two days
and I should really made the kids
a tee shirt to wear on Thursday!"
What?  Who said that?
The same person who hasn't had time to
do anything in four months and now
suddenly you want to start a complete
project and have it finished today?
Yes.  I work well under pressure.

I haven't done much sewing this year,
and it's been over ten years since I added
to my fabric stash, so I just started over.


I live fifty miles from the nearest craft store
so I was stuck with Wal-mart's scaled
down version of a craft aisle.  Seriously,
there aren't even bolts of fabric or buttons
at this Wal-mart.  Ugh.  So my selection was
beyond limited.

 I (finally) found a tee shirt for my Little girl -
not my first or my second choice,
but it will do.  I'm pretty happy with the
orange ringer tee I found for my Little boy,
but the Big boys tees are just okay.


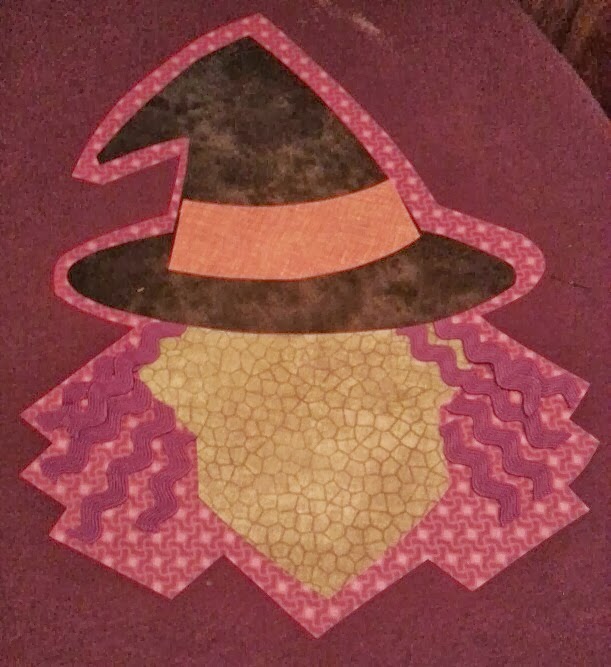
For the witch, I made a pattern.

I have the pattern scanned, but
I don't know how to add a link for you
to be able to download it.  If you would like
the pattern, just let me know and I
will email it to you.
Also, if there are any technically savvy
readers out there that wouldn't mind giving
me a quick tutorial - I would love
to learn how to add free patterns to my
crafty posts.
I should google uploading patterns.
Anyway, I made a pocket-shaped
face, hat and hat brim, and I used four coordinating
fabrics.  Not what I had in mind when I
got this little gem of an idea five hours ago,
but here goes:
Follow the directions
on the Heat n Bond(R) Ultrahold(TM)
to cut a large background piece from the
purple print fabric.

Face is cut from green
fabric, hat from black fabric, hat brim from orange.


Instructions say to wash garment first without
fabric softener.  I did not do this.
That would not be conducive to immediate
gratification, which I so look forward to.

I used a hot iron to adhere the background
shape to the center of the tee shirt.


Guess what?  I decided to use rick-rack as
hair, and I didn't want to glue it.
So I ironed the rick-rack onto the Heat n Bond
and it worked BeAuTiFuLlY!!
Guess what else.  When I removed the 
paper backing from the adhered rick-rack,
I was able to pull on the attached Heat n Bond
and it just came right off!
I was prepared to use scissors and everything.
No need.  I love wonders.  May they
never cease.  Ever.


I attached the face, then arranged the
rick-rack hair and adhered each piece with the iron.


I added the hat, then the hat brim.
It still needed something so I cut out 
a wart and a star for the hat brim.
I have some Swarovski crystals that are
just calling out to me - they
think they would look amazing somewhere
on this cute little witch, and I agree.


PS I added the eyes and the mouth
with a black paint pen.
NEXT!


I rushed through the Little's shirts
because I really wanted to get this up on my blog,
but have a better plan for the Big's shirts.
I'm going to cut out all my skull pieces, use 
the hot iron to adhere them to the fabric
that I want to use as a background,
THEN I will cut around for the background shape!
I just had a little trouble with
the spacing ... and I'm a little OCD so I
can deal with it on the Little's tees but I will be
much more precise when making the Big's tees!


Make a pattern for the background piece
by tracing around the skull design and leaving
about a 1/4" space.


I used the green as the background.
As you can see, I had some difficulty getting
all my skull pieces to line up inside
the background piece.  I had to do some
trimming.  I wasn't thrilled, but it worked.

I started with the top of the skull first.
I sort of got that lined up and pressed it down,
then I added the rest of the face pieces
and each bone, trimming and pressing
one piece at a time.


Love!!  I'm going to go pack up my
crystals now and my E6000 - I'll have four hours
at dance class tonight to sit and glue on
stones to make this witch sparkle!!

Peace and Happy Halloween Tees!

;)

Monday, October 28, 2013

Witchy Plant Poke - Great Last Minute Gift Idea!

Here's an easy~peasy Fall project
to make and give as gifts.
 In fact, I made a dozen!  True story.


So you start with a wood shim:

 ... or ten ... or twelve ...

Acrylic Paints: Green, Black, White,
Multi-Purpose Sealer
Glittery Spider brad, HALLOWEEN brad,
(these are brads I bought a few years ago~
I just placed a new order from
Oriental Trading Company for lots of
new Halloween brads ... can't wait!!)


The shims are usually pretty rough
and sometimes have splintery edges.
I used a sanding block
to smooth them down, and then
sealed the fronts with
Multi-Purpose Sealer.


Since I was making twelve of these,
I decided to cut a "face" shape
from a soda box.  Straight across the top
(where I'll put the hat brim)
and a "pointy" chin.
I used a 4" paint roller to apply
black paint to the fronts
of the shims.


I used a 1" flat brush to apply green
paint to the faces...


... all twelve of them!!
Once the paint is dry, sand lightly
with a sanding block.
Paint raises the grain in the wood,
so sanding lightly gives you
a smoother surface to paint on.


I trimmed the rounded ends off
of skinny craft sticks
to make hat brims.  Paint with
black paint, sand lightly.


Apply wood stain to the front,


sides,


and back of the shim.
I use an oil based stain, so I
wear protective gloves and allow
the pieces to dry overnight.


I used Tacky Glue to attach 1/2"
button plugs to the witch faces.

This photo shows me attaching 1/4"
button plugs as noses.
I waited until I'd glued on all twelve
plugs and the glue was
completely dry before changing
my mind.  I decided to use the 1/4"
plugs as warts, instead.


So, to recap, 1/2" plugs as noses,
1/4" plugs as warts, and
glue on the skinny sticks as hat brims.

The eyes are dip dots of black.
(I used a stylus, but you could use
a paintbrush handle if you
have one small enough).


I used a liner brush and thinned
black paint to apply a quirky mouth.


I used a liner brush and thinned
white paint to apply a spider web to
the witch's hat.


I added some black dots to the
nose and the wart; and
two crooked teeth to the quirky mouth.

I used my trusty rusty pliers
to snip the brad off the spider brad:


Then I used hot glue to attach the
now-bradless-spider to the hat.


I made the HALLOWEEN brad
bradless, too:


Snip! Snip!!


 Attach the bradless brad with hot glue.

Two years ago I bought each
teacher a potted mum,
and I poked in a Witch, a
Frankenmonster, and a Mummy.

They looked kinda (exactly) like this:


Here's this year's Witchy Plant Poke:


 Maybe Frankenmonster and the
Mummy need an update, too?  Always
nice to change your look
every once in a while.  I'll just
add those to my ever-growing To-Do List.

~ Peace and Happy Halloween Characters ~