Showing posts with label Tacky Glue®. Show all posts

Monday, October 28, 2013

Witchy Plant Poke - Great Last Minute Gift Idea!

Here's an easy~peasy Fall project
to make and give as gifts.
 In fact, I made a dozen!  True story.


So you start with a wood shim:

 ... or ten ... or twelve ...

Acrylic Paints: Green, Black, White,
Multi-Purpose Sealer
Glittery Spider brad, HALLOWEEN brad,
(these are brads I bought a few years ago~
I just placed a new order from
Oriental Trading Company for lots of
new Halloween brads ... can't wait!!)


The shims are usually pretty rough
and sometimes have splintery edges.
I used a sanding block
to smooth them down, and then
sealed the fronts with
Multi-Purpose Sealer.


Since I was making twelve of these,
I decided to cut a "face" shape
from a soda box.  Straight across the top
(where I'll put the hat brim)
and a "pointy" chin.
I used a 4" paint roller to apply
black paint to the fronts
of the shims.


I used a 1" flat brush to apply green
paint to the faces...


... all twelve of them!!
Once the paint is dry, sand lightly
with a sanding block.
Paint raises the grain in the wood,
so sanding lightly gives you
a smoother surface to paint on.


I trimmed the rounded ends off
of skinny craft sticks
to make hat brims.  Paint with
black paint, sand lightly.


Apply wood stain to the front,


sides,


and back of the shim.
I use an oil based stain, so I
wear protective gloves and allow
the pieces to dry overnight.


I used Tacky Glue to attach 1/2"
button plugs to the witch faces.

This photo shows me attaching 1/4"
button plugs as noses.
I waited until I'd glued on all twelve
plugs and the glue was
completely dry before changing
my mind.  I decided to use the 1/4"
plugs as warts, instead.


So, to recap, 1/2" plugs as noses,
1/4" plugs as warts, and
glue on the skinny sticks as hat brims.

The eyes are dip dots of black.
(I used a stylus, but you could use
a paintbrush handle if you
have one small enough).


I used a liner brush and thinned
black paint to apply a quirky mouth.


I used a liner brush and thinned
white paint to apply a spider web to
the witch's hat.


I added some black dots to the
nose and the wart; and
two crooked teeth to the quirky mouth.

I used my trusty rusty pliers
to snip the brad off the spider brad:


Then I used hot glue to attach the
now-bradless-spider to the hat.


I made the HALLOWEEN brad
bradless, too:


Snip! Snip!!


 Attach the bradless brad with hot glue.

Two years ago I bought each
teacher a potted mum,
and I poked in a Witch, a
Frankenmonster, and a Mummy.

They looked kinda (exactly) like this:


Here's this year's Witchy Plant Poke:


 Maybe Frankenmonster and the
Mummy need an update, too?  Always
nice to change your look
every once in a while.  I'll just
add those to my ever-growing To-Do List.

~ Peace and Happy Halloween Characters ~

Sunday, July 1, 2012

DCC Blog Hop - JULY

It's that time again!

I cannot believe how quickly the months
are flying by.  July already??  Really?!

Today's DCC Blog Hop theme is ...
... vacation!


I made a quick frame from a few of our
souvenir sea shells from down by the sea shore. (!)

First, I purchased a ready-made frame
from the craft and hobby store.  It was like $1.00 or
something completely ridiculous.
I probably bought a dozen.


Paint it up!!
I chose a turquoise blue - one
of my new favorite colors!

I painted two coats onto each side of the frame,
then sanded the front and sides smooth,
and heavily sanded the edges to remove some
of the paint.  This distressed technique is my fave.


 I chose a sandy color for the sand,
and applied two coats.

The color of this paint is ... Sand.  ;)
Not a stretch.
I painted over the sand with
Extreme Glitter - Hologram.


To give the "sand" a more "sandy" appearance,
I dipped a damp toothbrush into
Dark Chocolate acrylic paint and spattered
the paint onto the bottom part of the frame.

Then I set it outside in the 105° heat to dry.
It took like four seconds. 
I painted a coat of Extreme Glitter in blue
over the turquoise background paint.


About the shells:
with so many wonderful helpers on the beach,
I bring home pail-fulls of shells.

Mostly broken bits and pieces.

I learned a technique after our first beach
vacation.  I learned this technique the hard, smelly way.
If you get my drift:

One must thoroughly rinse the shells and set
them out in the sunshine to dry
- preferably DAYS - before
one puts them in the pails to bring home.

Because sometimes there are still critters inside
these shells.  It's their home, you see.
And children who are excited to find these
treasures on the beach, are not inclined to ask
whether they can take the shells home.

They just do it.

We have been much more considerate
of these critters in recent years.
As in ... if "someone" has already claimed
the shell, we must put it back.

But, I digress ...

I chose three that looked pretty perfect,
and I coated them with some
Extreme Glitter - Hologram
to give them some shine.


I wanted to include one of the long-legged
birds we love to watch at the beach;
first I thought I'd just paint him on the side of 
the frame, but since I was going to
go all 3-Dimensional with the sea shells,
I thought it would be cute to do the same for the bird.

So, I chose a pre-cut wooden bird shape
and painted it white.  I added a small teardrop-shaped
Woodsies wooden cut out for the wing, and I
painted that gray.  Then I gave him an eye
and a beak, and some r e a l l y long legs.
'Cause those are fun.
I've often wished I had really long legs.
Oh, well ... vertically challenged I shall remain.
Although, I have found some really
fabulous shoes that make me LOOK taller.
(yay!!) 


I spattered the bird with the damp toothbrush 
and darker gray paint.  Then I attached
the bird to the frame with Aleene's Tacky Glue.

I used the hot glue gun to attach the
sea shells; because I had been painting for hours
and I was ready to take the final picture
so I could go home and make another batch of
Lemon Bars.  Hot glue dries faster.
Especially heavier items, like the shells.
So if you're in a big hurry, use it.
Otherwise, if you have a few minutes, I
LOVE Aleene's Tacky Glue.
It dries very quickly as well ... and worked
great for the lighter-weight bird and wing.

Whichever.


 I wrote out the word "vacation" on a
piece of scratch paper.  I traced
it onto a piece of tracing paper with a 
permanent marker.  This was my pattern.
Then I centered it onto the top of the frame,
and applied the pattern with chaco paper and
a stylus.

(For the record, the chaco paper is great for
transferring patterns.  You can use light
colored chaco for darker backgrounds, and
dark chaco for lighter backgrounds.
Then, after you've applied your paint, you
can remove any visible lines with
water or a white eraser.
Pretty AWESOME stuff, actually).


I will dedicate a post to lettering, I promise.
For this post, I will tell you what I
did.  I used my favorite lettering brush.
(it's a 1/4" flat)
and I painted over each pattern line
with the Sand acrylic paint.

Once the paint was dry, I took
the same brush, dipped in Brown this time,
and started at the bottom of each
letter and pulled up, lessening the pressure
on the brush as I pull up,
in order to leave paint just on the bottom
part of each letter.

I did the same with White -
starting at the top of each letter
and pulling down - leaving paint just on the
upper part of each letter.

Once dry, I shaded around the letters
with a turquoise paint a shade darker than
the base coat.  Then I took my liner
brush and Dark Chocolate, and outlined
the left and lower part of each letter.

Spatter with the toothbrush.
Seal with a high gloss varnish.


I don't have any photos printed,
they're all on tiny chips and they're in
storage.  So I couldn't add a fun pic to the frame,
and I kept the title general.

I could have used "South Padre Island"
or "Destin, Florida" or something
more specific ... with a date ... and that
would be a fun project for someday when I'm
looking for things like that to do.

That'll be the day I finally decide to put
actual printed photos inside actual
photo albums.  Or better yet, actually
ScRaPbOoK with my thousands
of photos.  I'm gonna do that some day, too.
I promise.

Peace and ... Vacation Photo Frames


Friday, April 6, 2012

Spring Basket Pokes

Happy Spring!!


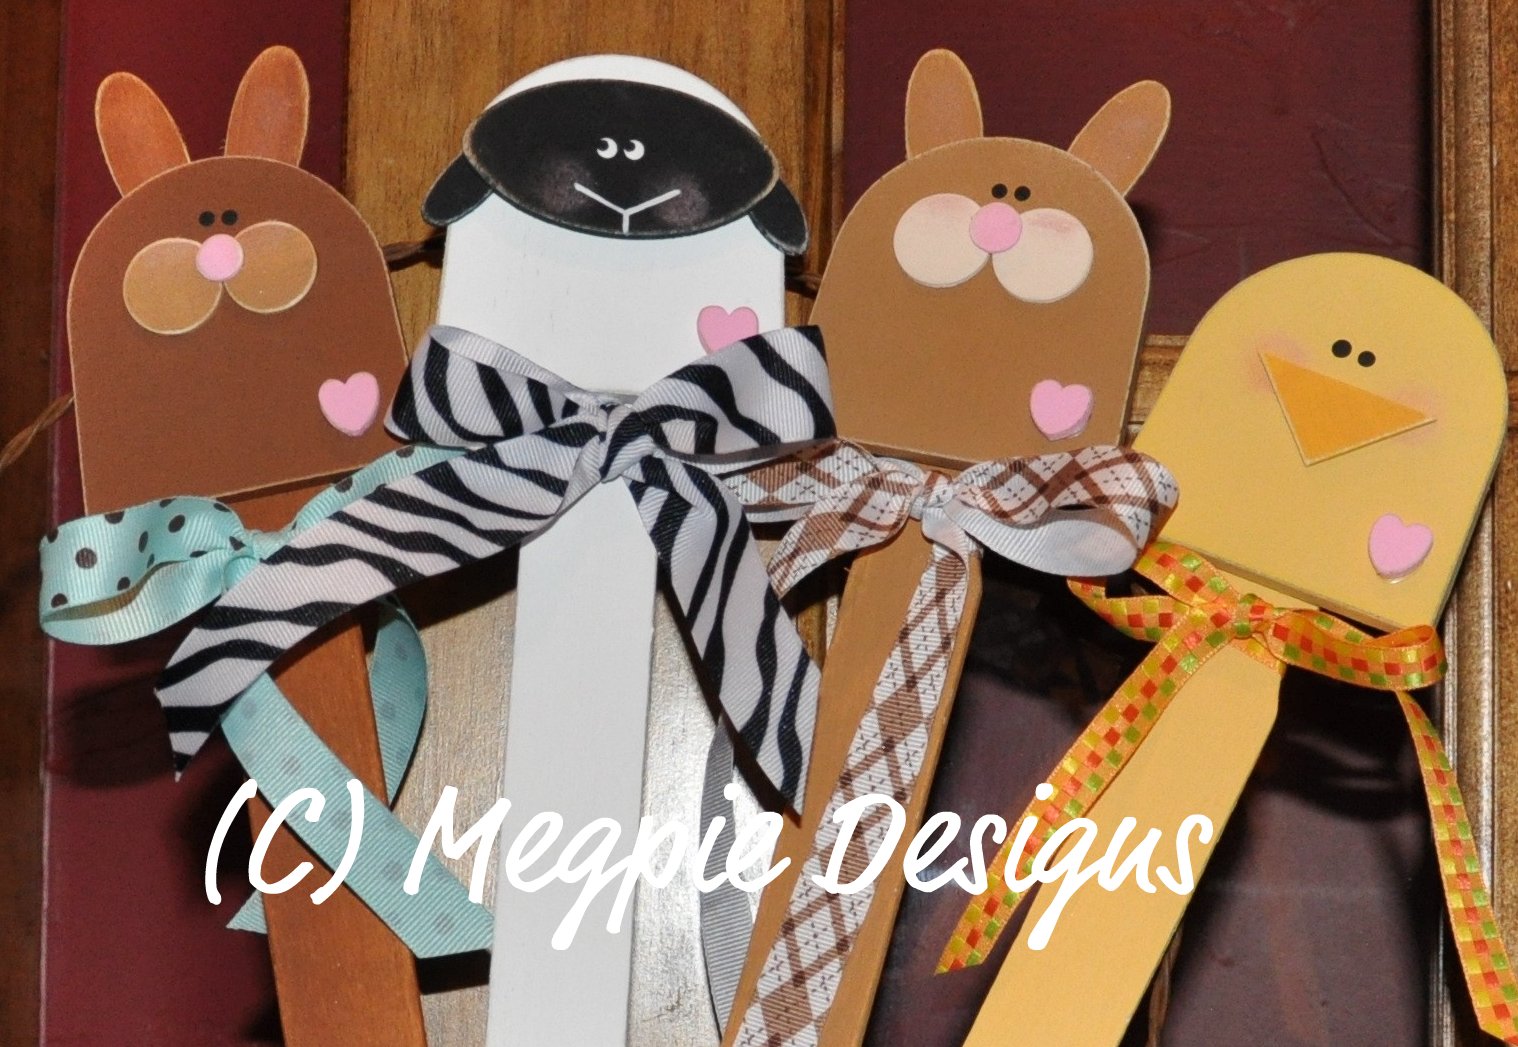
I've made these cute paint stick pokes
for today's Blog Hop -
using paint sticks and pre-cut wooden shapes!
Check out more Spring crafts
by clicking on the Designer Crafts blinkie
to the right of this post!!


Here's what you'll need to make the chick:


 Paint the beak marigold and the body
lemon yellow.  Sand edges with a sanding block.
Paint the stick lemon yellow. 


 Blush cheeks with pink powder blush
and a cotton swab:


 Use Aleene's Tacky Glue to attach beak.
Eyes are dip dots of black.


Attach body to the paint stick with
Aleene's Tacky Glue.
Tie coordinating ribbon around the neck.


I added a light pink wooden heart
just for character.


 These are the wooden shapes you'll
need to make the lamb.


 Paint the ears and face black.
Paint the body white.
Sand the edges with a sanding block.


Blush the cheeks with pink powder blush.
Eyes are dip dots of white, then smaller dip dots
of black.  Attach pieces with
Aleene's Tacky Glue.


Attach body to paint stick.
Tie coordinating ribbon around the neck.


Here are the shapes you'll need
to make the bunnies:


Paint body and ears brown.
Paint muzzle with a lighter shade of
brown, and nose is pink.


Blush tops of muzzle with
pink powder blush and a cotton swab.
Blush inside of ears with
the pink powder blush, as well.


Sand edges of wood with sanding block.


Attach pieces with Aleene's Tacky Glue.
Eyes are dip dots of black.
Tie coordinating ribbon around the neck.


I can't wait to poke these in the kids'
Easter baskets!!


Peace and Spring Critter Pokes

Thursday, January 27, 2011

Stick Puppet Valentines

Stick Puppet Valentines 


Grab those extra paint paddles from your last
painting project (or ask your local
paint store owner for a donation in your sweetest voice)
and let's get started!
You can poke these inside a little potted plant
or whip up a dozen or so for classroom
Valentines!

Here's what you'll need to get started:


A paint stick, Woodsies shapes:
(1 large circle, 1 small circle, 2 small teardrops for kitten;
1 small circle, 1 small teardrop, 2 large teardrops, 1 large oval for puppy)

Acrylic Paints: Decoart(R) Americana(R):
(Carousel Pink, Baby Pink, Slate Grey, Black for kitten;
Antique White, Bleached Sand, Light Cinnamon, Slate Grey, Black for puppy)

Two ribbon scraps, a permanent marker,
a sanding block, and tacky craft glue.


Kitten


 Use tacky glue to attach two teardrop shapes
to back of paint stick for kitten's ears.


  Paint kitten body and ears Carousel Pink;
sand edges with sanding block.


Paint large circle Baby Pink,
and small circle Slate Grey for nose.
When dry, attach with tacky glue.


Puppy


Base coat paint stick and one large teardrop
(ear) Antique White.


Trace large oval randomly onto
face and body; paint these spots and
other large teardrop (ear) Light Cinnamon.


Paint oval Bleached Sand;
paint small teardrop Baby Pink
(for tongue)
and small circle (nose) Slate Grey.


Attach pieces with tacky glue.
Dot eyes with black paint and a stylus or
the end of a paintbrush:


Finish:
Tie a piece of ribbon around the "neck"
and outline the details with
a permanent marker.


Woof you be Meow Valentine??

Peace out!!!