Showing posts with label Kids. Show all posts

Wednesday, February 26, 2014

Smoothfoam(TM) Valentine's Day Hedgehog

Here's a quick and easy
Valentine's Day project ... this
would make a great centerpiece for the
classroom or the teacher's lounge!


Supplies: 8" Smoothfoam(TM) Half Ball
Acrylic Paints: Red, White, Black, Brown
Sharpie Marker, Ruler, Stylus
Tracing paper & Transfer paper
(to transfer face to body)


 Base coat the Smoothfoam(TM) Half Ball
with two coats of Red paint.


Once the paint has dried, transfer the
hedgehog's face to the body
using transfer paper and a stylus
(or the handle of a paintbrush).


 Mix the red and white paint together 1:1
and paint the hedgehog's face pink.

Use brown paint for the inside of
the ears, the nose, and the patch of hair.
 The eyes are dip dots of black paint.

Use the ruler and measure out
1.5" from the head in the center of the
half ball ... use the stylus to poke a hole
every 1.5" along the hedgehog's back.
Repeat this until you have enough holes
 for the number of suckers you need.
(I only needed twelve, but there's plenty of
room for more if necessary!)


Paint a small heart onto each hole.

Once paint has dried, use Sharpie marker
to outline all the details.  Insert
a sucker into each hole.


~ Peace and Happy Valentine's Day! ~


Tuesday, September 25, 2012

Personalized Family Ornament

I love making personalized ornaments!
 
 My favorite Christmastime activity
is going through my boxes of ornaments -
 
aw, who am I kidding?
 
My favorite activity is sitting in
front of the fireplace with a hot toddy
and the glow from a fully decorated,
lit Christmas tree in the background,
and the knowledge that all the empty boxes
have been stored away neatly.
 
 
Anyway!!  I love making personalized
ornaments and using them as gift tags on
wrapped packages.  For a change,
this ornament is specifically for hanging.
Well.  I guess you could still use
it as a gift tag ...
 
To make one hearth, you'll need a
3"x4" wood square and one jumbo craft stick.
 
 
I used three pre-cut wood stocking shapes
(you could probably fit five stockings
on the mantle if you don't mind them
hanging off the edges a bit).
 
 
And one Woodsies skinny stick,
rounded ends trimmed and cut into three
cuff lengths (I trim all my wood shapes
with Easy Cutter Ultimate from
Midwest Products).
 
Acrylic Paints:
 
 
These are the colors I used:
Hauser Light Green, Napa Red, Slate Gray,
Lamp Black, White, and Multi-Purpose sealer.
You'll also want a sanding block.
A permanent marking pen.
And a 6" length of ribbon for hanging.
 
Trim one rounded end off the jumbo
craft stick, and then cut a 4 1/2" length.


 Paint the jumbo craft stick and
the rectangle gray.
Paint the stockings green.
 
Allow paint to dry thoroughly,
then sand the edges lightly
with the sanding block.


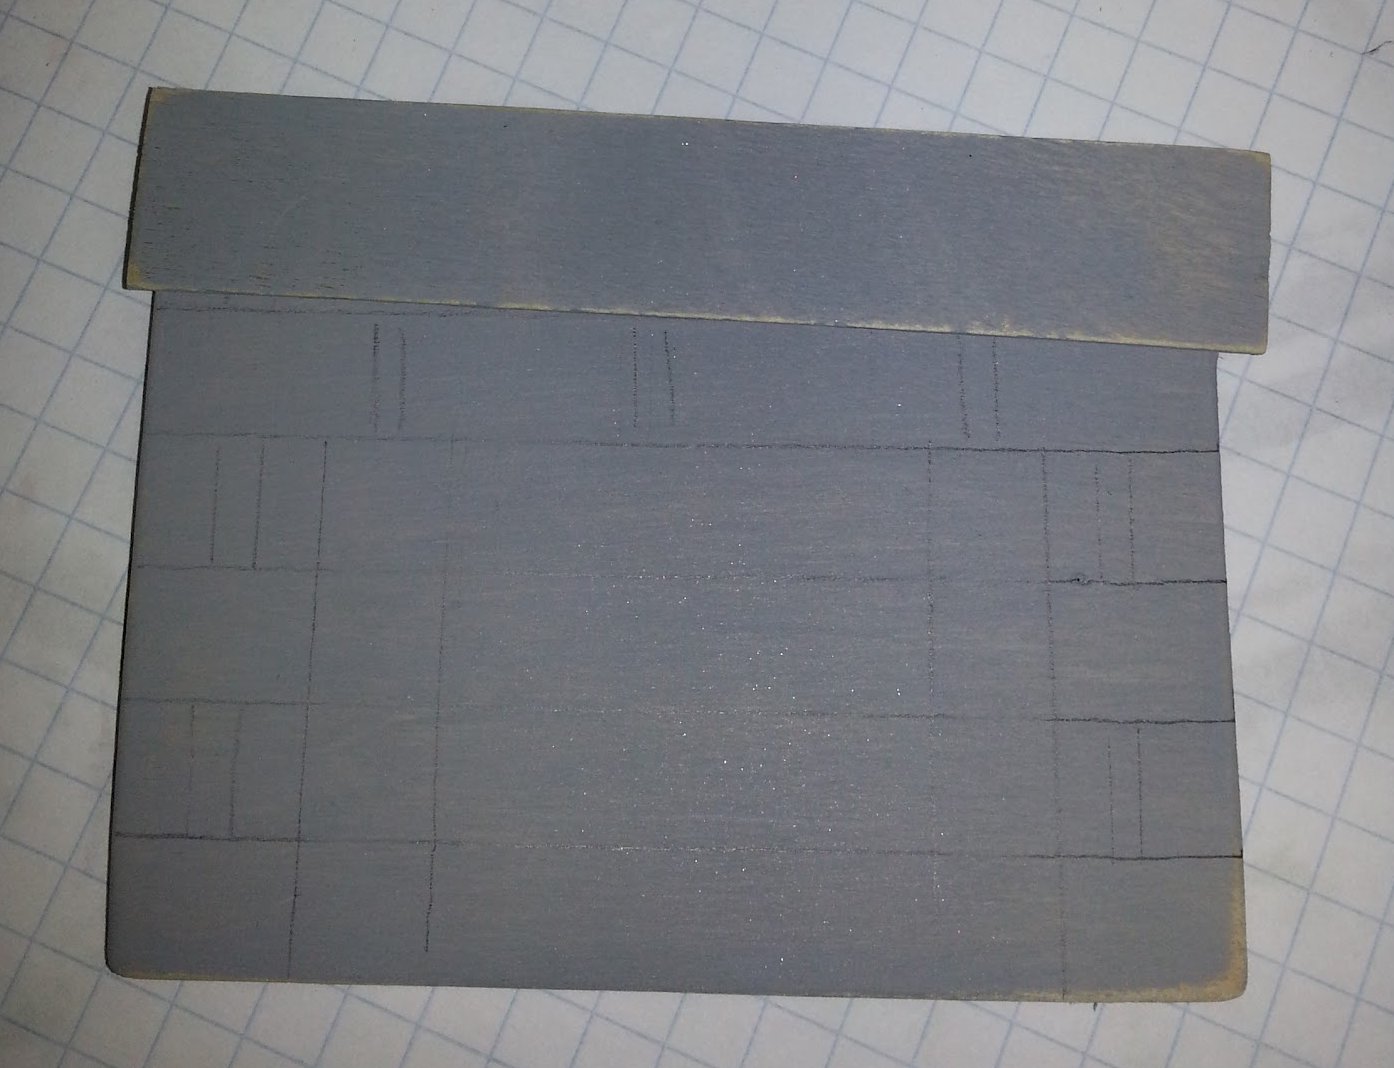
 I used a regular craft stick to measure
out straight lines, because crooked
lines really bug me.
:D


Then I blocked out a 2" square in the center
of the rectangle for the fireplace
opening.  I made a border around the
opening the same width as the craft stick.
 
 
Paint the square opening black,
and paint the bricks red.
(You don't have to be that neat ...
just get the basic brick shapes
in and leave a perimeter
of gray "mortar"):
 
 
Allow the paint to dry thoroughly,
then sand lightly with the sanding block.
Use a liner brush and white
paint to add details to the stockings.
 
 
Here's where I notice that not all my pics
uploaded from my phone to my
web album.  Actually, I noticed earlier,
when I wanted to post the pic I took
of all the wood pieces together.
 
Anyway, imagine you see the trimmed
skinny sticks painted white and sanded
lightly ... and then imagine you see
the pic I took of the cuffs actually
glued to the stockings.
 
 
 Seal each piece with Multi-Purpose sealer,
and allow to dry thoroughly.
Then use your pen to outline the
details, and write a name on each of
your stockings.
 
I used a thin red ribbon for
hanging ... I attached the ribbon by
putting a line of hot glue lengthwise
across the top of the rectangle where
the mantle will be, then secured
the ribbon by pressing the mantle in
place.  Sort of a ribbon sandwich,
if you will.  I used hot glue
to attach the stockings to the mantle.


From this ^
 
to this:
 
 
With just three or four photos
lost somewhere in cyberspace.
Hmm.
 
~Peace & Personalized Christmas Ornaments~

Friday, September 21, 2012

Hair Bow Holder

I'm not sure this really qualifies as a "craft"
but we did modify something we
purchased, and I did happen to take some pics,
so I'll post it anyway.  :D


 It all started when I told Doc that I wanted
a dressmaker-form cut from plywood,
and how soon could he do that for me?


Then we happen to be at Hobby together
(which is unusual, because I LOVE Hobby but
he does NOT love Hobby, so he
would ordinarily find somewhere, anywhere,
else to be while I'm inside the store)
and he picks up this item:


 And, assuming we are on the same page,
I say, "yes! Can you cut me one of those from
plywood?"  And he says, "This thing is half-off today.
We're buying it!" and all my dreams of
wearing safety goggles and smelling
fresh cut sawdust fade.


But I can be flexible.


So my Saturday night project involved
pilfering through my ribbon stash and hunting
down a pair of scissors and a needle and thread.
(Easy to do in my studio, not so much at home).


The alternative to making a Hair Bow Holder
was to find a Hair Bow Holder ...

which she did.


A pretty cheerful hair bow holder, too,
all things considered.  What goofs!!


I wanted the ribbons to be really long,
so we wouldn't have to make
another one of these things for a while.

I cut random LONG lengths of ribbon.
I folded one end over 1/8" and pressed with
my iron.  Then I wrapped it around
the wire frame and stitched it closed.


I repeated this until I had a ribbon
(or ribbons) on each of the
bottom sections of the wire form.


 After the silly floral-headed children
were finished modeling
the plethora of bows, flowers, and
feathers ...


We hung our new Hair Bow Holder
on the wall.  She loves it!  And I
love that I can finally fit my own comb
into my own bathroom drawer,
because it's no longer over-flowing with
flowers and fluff.  ;)


~Peace and Goofy Children~


Wednesday, September 12, 2012

Halloween (or not!) Skull Magnets

Who says skeletons are just for Halloween??
I keep this in front of the boys'
bedroom all year 'round:


You can turn a wooden circle cutout
into a spooky skull magnet!!
And, you can keep it around for the
rest of the year.  Especially if
you're a teenage boy.
Or a pre-teenage boy.
Of which I have a few.
Just sayin'.


I have a house full of boys.
The boys have lockers at school.
These school lockers need
groovy magnets to hold up class
schedules, phone numbers, and
other important information.

(Sometimes I employ the "don't ask,
don't tell" tactic.  This may
or may not be one of those times).


I thought it would be fun
to make some "Halloween" magnets
for their lockers ... and the
Jolly Roger seemed just right
for boys.


For each magnet, you will need
a Woodsies(TM) Jumbo circle
cutout, a large (1/2") circle magnet,
acrylic paints in black, white, gel stain,
One Step Crackle finish, and
clear gloss varnish.
You will also want two sizes of
paint brush (a large flat or wash
brush to base coat and seal, and a fine
detail brush for the skull and bones),
a sanding block, a clean rag, some
crafting glue, and
one tiny acrylic stone.


Base coat the front, back, and sides
of each circle with black paint.
Here's a tip:


Use a sanding block to remove the
paint from the edges of the circle.
 Apply main pattern lines with
light colored transfer paper and a stylus.


Paint the skull and the bones
with white (or cream) paint.


I couldn't decide whether to
go with a white or a cream color
paint for the Jolly Roger.  I know which I like
better now that I'm finished ...
let me know what you think!


Once the paint was dry,
I used a white eraser to remove
all transfer paper lines.


 I brushed on a thick coat of
One Step Crackle paint and allowed
the pieces to dry thoroughly.


Next, I wiped a small amount
of Gel Stain onto the front of each
circle with a corner of my rag.  Then I wiped off
the Gel Stain with a (different)
cornerof my rag.


Finally, I brushed on a coat of
Multi-Purpose Sealer.
I (photographed my child using)
a hot glue gun to apply
the magnets to the back 
of each wood circle.

Mainly because she begged,
but also because it's really
difficult (read: impossible) to
hold the glue gun, the wood piece,
and the camera all at once.
Unless I somehow wedge the camera
under my chin.  But then I
can't see nor can I press the button.
So it just made sense
to let her glue for me.  I love helpers!!


 and I attached
the tiny acrylic stone with
Aleene's Tacky Glue
and a toothpick.


I think the stone makes it awesome!
The glue dries clear, btw.
I hadn't made enough of these
initially and had to dash
back out to the studio after dinner and whip
up a few more.  Somehow I didn't
get a final pic of the magnet.

Good mom that I am,
I have already texted each boy
and requested they take a photo of
their magnets for me.
I figured, even if they don't get the
texts during the school day,
surely (at least one of them)
will be checking his phone immediately
after school, leaving him
enough time to dash back to his
locker and take a picture.
For me.
Mom.
Because I forgot.
Because that's just how I roll.
Remember??


~ Peace and Jolly Roger Magnets ~


Tuesday, August 14, 2012

A Teacher's Survival Kit

 It's that time again!


School starts tomorrow for us ...
I've made up a goody for each
of our teachers and I wanted
to share my idea with you.


(If school has already started,
you could still whip these up ...
better late than never!)


Bandages,
Aspirin,
Emergency Chocolate...


Those are the most important
items in this Teacher's Survival Kit!!


In addition to the jar,
you'll need spray paint for the
jar lids and rims, scrap paper in fun colors
or patterns, a hole punch, and
colored raffia or string.
Oh, and double stick tape and a
permanent marker.


Also gather the things you want to put inside
each jar.  I'm a last minute kind of girl,
so this morning I asked myself:
Self? What did you wish you had handy
when you were faced with a room
full of second graders?!
I'm sure there are
more clever items that I didn't think of!
Feel free to add or substitute.


These were my thoughts:


Soda (I couldn't fit a soda in the jar,
so I added several quarters for the soda
machine), Pain Reliever (ha!),
Minty Gum, Tums, Chapstick,
Chocolate, Almonds (for energy),
Cookies (for fun), Assorted Binder Clips
and Paper Clips (to help keep it together!),
Post It Notes, Bandages, and Hard Candies.


 I used spray paint to coat the jar rims and lids.
Once the first coat was dry, I sprayed
a coat of clear spray sealer over each piece.


Cut a large circle from patterned scrap paper
and attach to each lid with glue
or double sided sticky tape.


I created a tag for each jar:
I cut 2" squares from dark blue paper,
1.5" squares from gold paper,
and I used a permanent marker to
write: Teacher's Survival Kit on each gold square.
You could also print these and
then cut them out.  Whichever!!


I attached the squares to a pre-cut manila
tag, and wrote the teacher's name
across the bottom of the tag.  I used my
laminating machine to laminate each of these
tags, but I have also used clear contact
paper to laminate.  (Just cut two pieces of clear 
contact paper a smidgeon larger than your paper tag.
Seal the tag between the two sheets
of contact paper.  Trim edges as desired).
I tied a tag to each jar
and added a raffia bow to the neck.


Super cute!!!
I can't wait for school tomorrow!


 Peace and Emergency Chocolate ;) 


Also ... here is a quick idea for personalizing
school supplies: you know, I love using a Sharpie marker,
but by the time each of my four children has a list
twenty or more items long ... ... ...
not so much.


 I also use tinyprints.com for personalized
Valentine's Day cards; and for my
oldest, I ordered a red sticker with
"From Brady" printed on it
and I will stick them to a zipper lock
baggie full of yummy treats.
So.  Simple. 

:)