Showing posts with label Multi-Purpose™ Sealer. Show all posts

Monday, October 28, 2013

Witchy Plant Poke - Great Last Minute Gift Idea!

Here's an easy~peasy Fall project
to make and give as gifts.
 In fact, I made a dozen!  True story.


So you start with a wood shim:

 ... or ten ... or twelve ...

Acrylic Paints: Green, Black, White,
Multi-Purpose Sealer
Glittery Spider brad, HALLOWEEN brad,
(these are brads I bought a few years ago~
I just placed a new order from
Oriental Trading Company for lots of
new Halloween brads ... can't wait!!)


The shims are usually pretty rough
and sometimes have splintery edges.
I used a sanding block
to smooth them down, and then
sealed the fronts with
Multi-Purpose Sealer.


Since I was making twelve of these,
I decided to cut a "face" shape
from a soda box.  Straight across the top
(where I'll put the hat brim)
and a "pointy" chin.
I used a 4" paint roller to apply
black paint to the fronts
of the shims.


I used a 1" flat brush to apply green
paint to the faces...


... all twelve of them!!
Once the paint is dry, sand lightly
with a sanding block.
Paint raises the grain in the wood,
so sanding lightly gives you
a smoother surface to paint on.


I trimmed the rounded ends off
of skinny craft sticks
to make hat brims.  Paint with
black paint, sand lightly.


Apply wood stain to the front,


sides,


and back of the shim.
I use an oil based stain, so I
wear protective gloves and allow
the pieces to dry overnight.


I used Tacky Glue to attach 1/2"
button plugs to the witch faces.

This photo shows me attaching 1/4"
button plugs as noses.
I waited until I'd glued on all twelve
plugs and the glue was
completely dry before changing
my mind.  I decided to use the 1/4"
plugs as warts, instead.


So, to recap, 1/2" plugs as noses,
1/4" plugs as warts, and
glue on the skinny sticks as hat brims.

The eyes are dip dots of black.
(I used a stylus, but you could use
a paintbrush handle if you
have one small enough).


I used a liner brush and thinned
black paint to apply a quirky mouth.


I used a liner brush and thinned
white paint to apply a spider web to
the witch's hat.


I added some black dots to the
nose and the wart; and
two crooked teeth to the quirky mouth.

I used my trusty rusty pliers
to snip the brad off the spider brad:


Then I used hot glue to attach the
now-bradless-spider to the hat.


I made the HALLOWEEN brad
bradless, too:


Snip! Snip!!


 Attach the bradless brad with hot glue.

Two years ago I bought each
teacher a potted mum,
and I poked in a Witch, a
Frankenmonster, and a Mummy.

They looked kinda (exactly) like this:


Here's this year's Witchy Plant Poke:


 Maybe Frankenmonster and the
Mummy need an update, too?  Always
nice to change your look
every once in a while.  I'll just
add those to my ever-growing To-Do List.

~ Peace and Happy Halloween Characters ~

Thursday, January 24, 2013

Ladybug Reindeer

What do you get when you
cross a ladybug with two cacti?


A reindeer, of course!
Well, a reindeer made from
pre-cut wooden shapes, anyway.
;)


For this reindeer ornament,
you'll need (1) 2" ladybug shape,
(2) 1.25" cacti shapes,
(1) 4" length of ribbon,
acrylic paints in Honey Brown,
Chocolate, Tuscan Red, Black, White,
One Step Crackle,
Gel Stain, a Multi-Purpose Sealer,
and Extreme Glitter Hologram.
(or Extreme Glitter Red, but I was out).


Paint the following:
Cacti - Honey Brown
Ladybug Body - Chocolate
Ladybug Head - Tuscan Red

Brush a generous coat of
One Step Crackle onto the cacti
and allow to dry thoroughly.
Apply Gel Stain and wipe off with
a clean, dry rag.
The gel stain works its way into
the tiny little cracks made
by the One Step Crackle ...


See the tiny crackles??
I Love it!!

Apply Extreme Glitter Hologram
generously over the Reindeer nose.
(Previously referred to as the "Ladybug Head")


Next, cross ribbon ends to form
a loop for hanging.


Attach the ribbon to the back
of the reindeer head with
a hot glue gun:


Attach the two cacti to the
back of the reindeer head;
it's fine if the cacti overlap the
ribbon, that will help keep it in place.


I dipped a paintbrush handle into
white paint to dot the eyes.
Once it was completely dry, I
added black dots to the eyes.


I brushed Multi-Purpose Sealer
over the entire piece.

NOTE: I almost always paint the backs
of my ornaments, but since I was
going to use hot glue to attach the antlers,
I wanted a good adhesion so I
left the back of this ornament unpainted.
Just keepin it real.
Sometimes those boogers fall off,
and we don't want any of that going on,
am I right??

Up next: I have eighty ornaments
to make for classrooms this year.

(that's an 8 and a 0
it's also 10 times 8, or
8 times 10, or 20 times 4, or
4 kids times 20 students per
classroom.  And, I should probably do
a recount before I get started.
Cuz I'm pretty sure I heard about
new students somewhere).

What kind of ornament do I want to
make in bulk?  I want the ornament to
be special for the kids, something to bring back
(hopefully!) fond memories of elementary school.
So I'll use the school name and/or
their mascot somehow ... but, hmm ...

 Here's my 2010 design:


 Here's my design from last year:


Oh, wait! Do you hear that?
Yeah, that's Hobby Lobby calling my
name.  I'm going to have to make a trip.
No, wait.  That's my studio calling
reminding me that I have enough supplies
to make ornaments for the entire town
and I shouldn't be buying more "stuff".

Christmas Inspiration, HERE I COME!!
And I think I might just challenge myself
to make all these ornaments
with supplies I already own.
What d'ya think of that??
  

~ Peace and Lots of Christmas Ornaments ~


Saturday, September 22, 2012

Halloween Crafts - Repost!!

Okay ... my To-Do List for Halloween -
post how-to's for a few of
my past favorites!!  Here are some pics
of the projects on my list ...

Items needed: PAINTSTICKS!!!
(or shims - I've used both)


Saturday, September 15, 2012

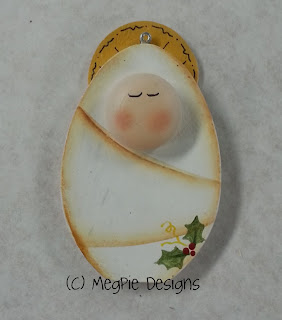
Baby Jesus Ornament

This little craft is perfect for the
classroom - even the very young could
make these if you did a little
prep work ahead of time.
 You'll need the following supplies:
A 3/4" round head button plug,
a Woodsies giant oval,
a Woodsies small oval,
a scrap of gauze
(I had mine left over from Halloween)
acrylic paint: Flesh Tone, Marigold,
Extreme Glitter Gold, Multi-Purpose Sealer,
pink powder blush, a cotton swab,
a hot glue gun, glue sticks,
a permanent marking pen, a button, 
and a ribbon scrap.

Baby Jesus ornaments make me happy!
Here are two of my earlier designs:
  Hmm.  This one must be so old
I haven't even blogged about it.
I will put this on my To-Do List.  :)
Back to this year's ornament:
  Paint the button head Flesh Tone and allow
to dry thoroughly.  Blush the cheeks
with pink powder blush and a cotton swab.
Seal with Multi-Purpose Sealer.
Paint the small oval Marigold.
When dry, brush with Extreme Glitter Gold.
 
 
 Wrap the gauze scrap around the oval.
I found that really stretching the
gauze tightly and tucking in all loose ends
works the best.  Use hot glue
to secure the end of your gauze on the
back of the oval.
 
 Once your painted pieces are dry,
you're ready to assemble the ornament.
 
Put a small amount of hot glue on
the front bottom of the halo;
press the back of the gauze wrapped
oval to the front of the halo.
Flip ornament over.
Use a dot of hot glue to attach the
ribbon for hanging to the back of the halo.
For added support, I used a button
to sandwich the ribbon between
the oval and the button.
 
 
 This is what the front of your ornament
should look like.
Add closed eyelids by drawing two
"U" shapes with the pen.


I thought the ornament still needed
a little something, so I dug
through all my supplies until I found
this holly sprig.  I think I liked it because
it looked so much like my earlier
ornament where I painted the 
swaddling clothes and I painted the
holly sprig.  Any little decoration would
do ... a star, a heart, be creative.


~ Peace and Baby Jesus Ornaments ~