
Here it is!!
The second in a series of FIVE tutorials
for making Quick and Easy
Bazaar-Worthy Crafts!
Snowman Snow Sign

Just in case this is the first
or only project you're looking at today,
I'll stick with the same format.
The Basics:
(what you'll need to make this craft)
3" x 4" wood rectangle sign,

1" wood button plug for the snowman;

acrylic paints: white, black, light blue, dark blue;
snowflake stencil; stencil brush;
foam roller or 2" wash brush;
sanding block;
tooth brush and jumbo craft stick
(for spattering)
pink powder blush and a sponge dauber
or cotton swab for blushing cheeks;
stylus for dotting eyes and coal mouth;
glue gun and glue sticks;
Crop-o-Dile or hand drill for holes;
12" length of ribbon, string, or craft wire
for hanging
Here's a note for beginner painters:
There are certain stencils that never go
out of style. I bought background stencils
fifteen years ago that I still use -
stars, snowflakes, stripes, checks
these are good staple purchases you won't regret,
and I use them in almost all my projects.
Especially the snowflakes -
every project looks like it has a little more depth
when it's lightly stenciled.
Getting Started:
Again with the motto:
Always Paint in Multiples!!!
If you're thinking you only need one,
remember: these make great package tie-ons
ornaments, or hostess gifts -
(hanging around the neck of a bottle of wine);
you'll never regret making a few extras,
but you might be reluctant to pull all the "stuff"
out again just to make "... one more ..."

Base coat your rectangle signs with
the light blue.
I like to mix up a few colors
(such as light blue, dark blue, and white)
on a palette and then roll them onto my surfaces
with a paint roller. It makes short
work of the base coating, and frankly,
I find the splotchy look more interesting.
When the paint is dry, flip your rectangles
and paint the backs and sides.
Use the sanding block to smooth the surface
of the rectangle sign, and
press hard enough on the edges to remove paint.
Next, thin a small drop of dark blue paint with water,
and dip the toothbrush in the inky paint.
Blot the toothbrush on a paper towel.
(See previous post for pics)
Then run the craft stick along the bristles
moving away from your body -
the result is tiny paint spatters on your signs.

Here's a basic tip you need to know if you
are planning to do any stenciling:
A LITTLE goes a LONG way!
Trust me on this one! Please!!
Even just the smallest drop
of extra paint will leak up underneath
the stencil and ruin your crisp edges.

Dip the stencil brush into the paint puddle.
Then wipe bristles in a circular motion
onto a clean, dry paper towel.
You want to remove as much paint as possible!
Even if you think there's no paint left in those
bristles, once you touch those "dry"
bristles to your surface, you'll see what I mean.

Hold (or tape) your stencil firmly in place;
"pounce" stencil brush in an up-and-down motion
until you've transferred your snowflake.
(NOTE: You don't need this specific snowflake stencil;
any snowflake stencil will do. Small, large, ANY snowflake).
If you think the stencil is too "dark" -
wait until it is completely dry and then
use your sanding block to remove some of the paint.

I used graph paper to write the word "snow"
this way I was able to keep the
letters the exact size I wanted them.
I like to use transfer paper and a stylus
to apply my letters;
this way I am able to center them exactly
where I want them on my sign.
Add clean water to a small puddle of
white paint, making an inky consistency.
Use your liner brush to "trace" over the letters
you've transferred to the sign.
I used the end of my paintbrush handle to
add little 1980's dots to the
ends of each of my letters.
You could use dashes instead of dots ...

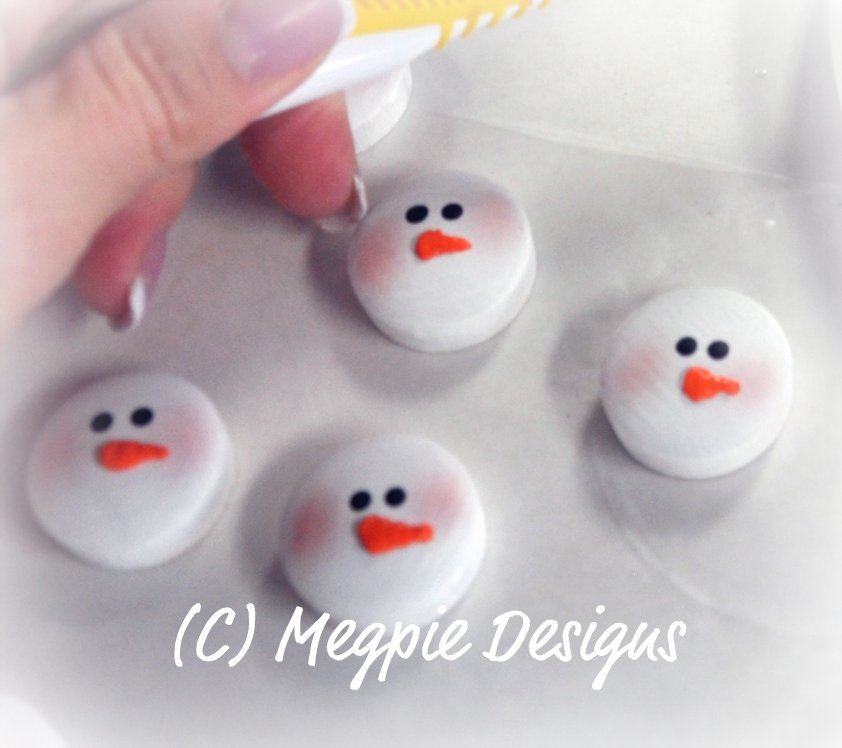
I love to use pink powder blush on my faces!
I've always used a clean cotton swab
to apply the blush, and it looks great.
Sometimes I have to reshape the tip of the swab
if I'm making multiple faces,
so I started using Plaid's sponge-tipped daubers.
Great idea! Perfect little cheeks
every time!!

Next, we'll dot the eyes and the coal mouth.
I like to use a stylus for this,
but you could use a toothpick or the end
of a brush handle ... just test your
dots on practice paper first to make sure
they aren't too big! Too small is easy to fix -
just dab directly over the too-small-dot with a
fresh dot of paint.
(Actually, I dotted all the eyes, THEN
I added the carrot noses,
gave them overnight to dry before
I added the dip-dot coal mouths).
If you don't want to stop in the middle
of your project and begin again the next day,
just dot the mouths the same time
you dot the eyes, and leave the
carrot noses for last.
(They still need overnight to dry)


Now for the carrot noses.
If you want to see a tutorial for the noses,
you can click here.

Basically, I use Tulip Slick Fabric Paint
in Orange. Starting at the base
of the carrot, I squeeze a tiny dot out -
without lifting the bottle, lessen your "squeeze"
as you pull the paint into a tip.
Practice on paper first!
Get a "feel" for your "squeezing"!!
Now we'll glue the snowman head to the sign.
I would love to tell you that I have one big old
glue gun that I've loved and used for years,
and it's covered in paint and bits of stuff and things that
got stuck to it (after all, it's a glue gun)
and I would love to tell you this because then
I would sound ... normal ...
... but ...
the truth is, I have lots of glue guns.
And they're ALL covered in paint and
bits of "stuff" and "things"
that have gotten stuck to them
over the years of crafts I've been crafting.
I have a fetish for glue guns, you see.
Admitting you have a problem is the
first step towards recovery.
I'm not sure which step requires you to show
a picture of your obsession,
but I'm still at the first step - so it doesn't really matter.

Flip that snowman button plug over
and add a dollup of glue
to the back (which I left unpainted)
( I paint the backs of all my projects.
I think it makes them look "finished".
I don't paint the backs of anything that will
be glued down ... because
I think that makes it easier to fall off
with time and use.
I could be wrong.
I'm just sayin').

Stick it right where you want it,
press and hold for like ONE SECOND,
and it's stuck! I just LOVE glue guns!!!
Talk about instant gratification!!

Now you want your Crop-o-Dile or
your hand drill or your drill press or your
hubby to put some holes in the
top corners of your sign.
I used a ribbon hanger this time,
just 'cause. No real reason.
Here it is:

*** peace and snowflakes ***
3 comments:
This is so cute! Gonna have to make 1 or 5 of these!!!
xoxo
Joy
Thank you, Joy! Yes, my motto is, if you can make one you might as well make three! Or a dozen!! Happy Painting! :)
My relatives every time say that I am wasting my time here at web, but I know
I am getting experience all the time by reading thes pleasant
articles.
my page; Replica Rolex
Post a Comment